Javascript and JQuery tutorial how to add "read more" and "read less" at the end of the text after a certain number of characters.
How to add Read More/Read Less button next to a too long HTML element.
This tutorial will take you through how to display a certain number of rows of an HTML element and hide the rest of it, then we will see how to read a clickable “Read More” element at the end of the text in order to display/hide the rest of the text.
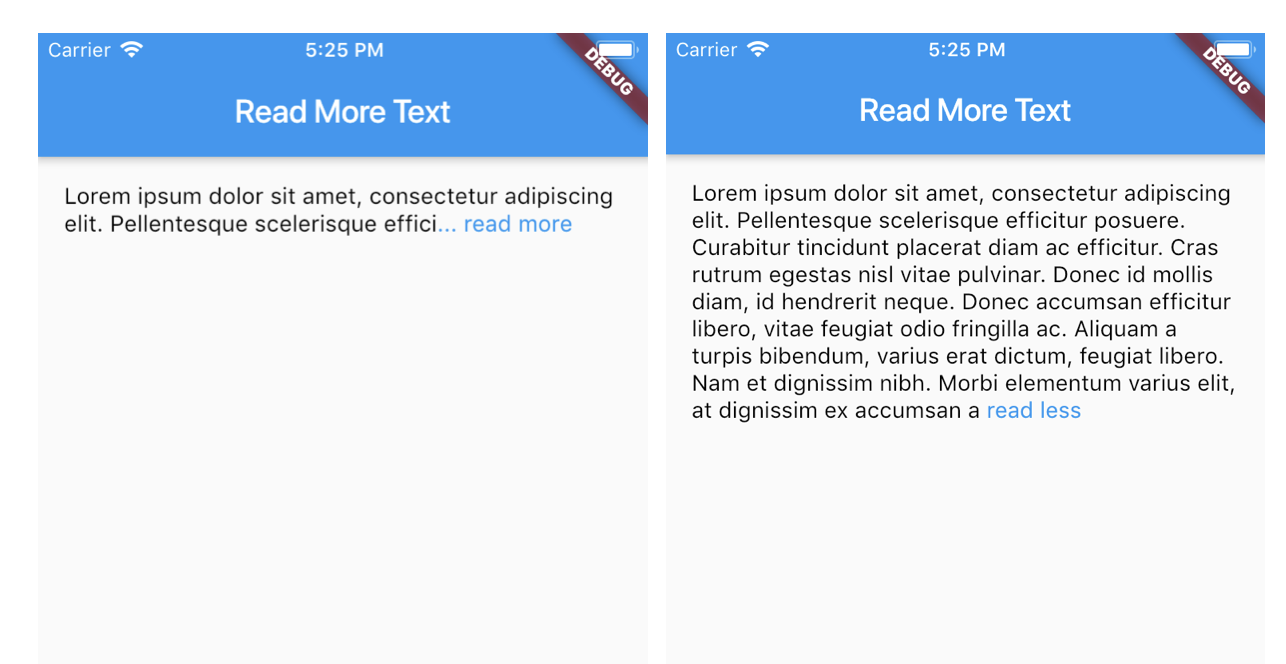
The challenge here is, I would like to keep a part of the text always visible and display a text “…read more” after it, eventually, when the text is fully visible, I want to add a new element called “read less” in order to hide the second part of the text. I want to apply this logic to any HTML element just adding a CSS class to it. I also want to have the possibility to decide how many characters of the text I want to display before hiding the second part.
First of all, I need a CSS class to recognize the HTML element that I want to play with, let’s say that the CSS class will be ‘.add-read-more‘, initially, I want to detect if the text is completely displayed or if part of the text is hidden, so I will add another CSS class to the HTML element called “.show-less-content“. Now I can get the text of the HTML through JQuery and I check if the text is long enough, for example, I will check if the text is greater than 300 characters, if the text is less than 300 characters I won’t change anything of it, if the text is greater than 300 characters I will split the text into two sections and through CSS I will hide the second part.
Now I just need to add the “read more/read less” section at the end of the visible text, I will use an HTML <span></span> to do that, this HTML element will contain the two buttons “read more” and “read less”. The last thing to do is create a JQuery function that detected the click on the “read more/read less” section and it will open or close the second part of the text.
Here is the whole Javascript code of the logic explained above:
jQuery(function ($) {
   function AddReadMore() {
      //This limit you can set after how much characters you want to show Read More.
      var carLmt = 300;
      // Text to show when text is collapsed
      var readMoreTxt = " ...read more";
      // Text to show when text is expanded
      var readLessTxt = " read less";


      //Traverse all selectors with this class and manipulate HTML part to show Read More
      $(".add-read-more").each(function () {
         if ($(this).find(".first-section").length)
            return;

         var allstr = $(this).text();
         if (allstr.length > carLmt) {
            var firstSet = allstr.substring(0, carLmt);
            var secdHalf = allstr.substring(carLmt, allstr.length);
            var strtoadd = firstSet + "<span class='second-section'>" + secdHalf + "</span><span class='read-more'  title='Click to Show More'>" + readMoreTxt + "</span><span class='read-less' title='Click to Show Less'>" + readLessTxt + "</span>";
            $(this).html(strtoadd);
         }
      });

      //Read More and Read Less Click Event binding
      $(document).on("click", ".read-more,.read-less", function () {
         $(this).closest(".add-read-more").toggleClass("show-less-content show-more-content");
      });
   }

   AddReadMore();
});
In order to make the code a bit more standard, I will use variables to manage the number of characters and the Text to show when text is collapsed/expanded. Please see the variables called “carLmt, readMoreTxt, readLessTxt” on the code above.
Now I will include the CSS in the code, here is the style:
.add-read-more.show-less-content .second-section,
.add-read-more.show-less-content .read-less {
   display: none;
}

.add-read-more.show-more-content .read-more {
   display: none;
}

.add-read-more .read-more,
.add-read-more .read-less {
   font-weight: bold;
   margin-left: 2px;
   color: blue;
   cursor: pointer;
}
The last thing to do is add the mentioned CSS classes to the element that we want to modify, here is the HTML code for it:
<p class="add-read-moreshow-less-content">Lorem Ipsum is simply dummy text of the printing and typesetting industry. Lorem Ipsum has been the industry's standard dummy text ever since the 1500s, when an unknown printer took a galley of type and scrambled it to make a type specimen book. It has survived not only five centuries, but also the leap into electronic typesetting, remaining essentially unchanged. It was popularised in the 1960s with the release of Letraset sheets containing Lorem Ipsum passages, and more recently with desktop publishing software like Aldus PageMaker including versions of Lorem Ipsum. </p>
And this is all I think, here is the result:
Lorem Ipsum is simply dummy text of the printing and typesetting industry. Lorem Ipsum has been the industry’s standard dummy text ever since the 1500s, when an unknown printer took a galley of type and scrambled it to make a type specimen book. It has survived not only five centuries, but also the leap into electronic typesetting, remaining essentially unchanged. It was popularised in the 1960s with the release of Letraset sheets containing Lorem Ipsum passages, and more recently with desktop publishing software like Aldus PageMaker including versions of Lorem Ipsum. It has survived not only five centuries, but also the leap into electronic typesetting, remaining essentially unchanged. It was popularised in the 1960s with the release of Letraset sheets containing Lorem Ipsum passages, and more recently with desktop publishing software like Aldus PageMaker including versions of Lorem Ipsum
To see the whole code in action, please have a look at this task on CodePen at this link: https://codepen.io/webmarcello8080/pen/oNGmGWL
How to add “Read More” link to a HTML element with a slide animation
Jquery provides a series of functions in order to animate, slide in, slide out certain HTML elements, so we don’t need to create an animation from scratch, in the code I will use the method “animate” in order to create the slide effect, please have a look at the official documentation for future reference.
The first thing to do in this case will be to reduce the text height if the text is longer than a certain amount of pixel, for instance, let’s say that I want my text to be a maximum of 200px. I get the HTML element by class (I will use the class ‘slide-read-more‘), I check if the element height is greater than 200px, if the element is too long I will set the height of the text to 200px, then I will display the “Read More” button, which I previously hid on the bottom of the ‘slide-read-more‘ text.
To get the current height of the text I will use the JQuery function .innerHeight() which gets the current computed inner height (including padding but not border) for the first element in the set of matched elements or set the inner height of every matched element. Here is the documentation.
Then I will create a JQuery function based on the click of ‘.slide-read-more-button‘. When the button is clicked, I check the height of ‘slide-read-more’, if the text is 200px I remove the height of 200px that I previously added and I run animate to display a slide animation. If the text is longer than 200px, I will set the height of the text to 200px and I run the animate function.
I will add the buttons ‘.slide-read-more-button‘ on the bottom of our text, one that says “Read More” and one that says “Read Less“, and once the button is clicked I will swap the two buttons with jQuery toggle().
This approach seems more simple than the previous and the result is more interactive. Here is the Javascript code:
jQuery(function ($) {
   // resize the slide-read-more Div
   var box = $(".slide-read-more");
   var minimumHeight = 200; // max height in pixels
   var initialHeight = box.innerHeight();
   // reduce the text if it's longer than 200px
   if (initialHeight > minimumHeight) {
      box.css('height', minimumHeight);
      $(".read-more-button").show();
   }

   SliderReadMore();

   function SliderReadMore() {
      $(".slide-read-more-button").on('click', function () {
         // get current height
         var currentHeight = box.innerHeight();

         // get height with auto applied
         var autoHeight = box.css('height', 'auto').innerHeight();

         // reset height and revert to original if current and auto are equal
         var newHeight = (currentHeight | 0) === (autoHeight | 0) ? minimumHeight : autoHeight;

         box.css('height', currentHeight).animate({
            height: (newHeight)
         })
         $('html, body').animate({
            scrollTop: box.offset().top
         });
        $(".slide-read-more-button").toggle();
      });
   }
});
In order to keep my code a bit more standard I set a couple of variables, minimumHeight contains the number of pixels that the text will be initially, box is the JQuery element (or elements) with class ‘slide-read-more’, currentHeight is the current height of box, initialHeight contain the current computed inner height of box.
Now I just need to add some CSS in order to hide the extra text that I don’t want to display and in order to style the ‘Read More’ button. Here is the CSS code:
.slide-read-more{
     overflow:hidden;
 }
 .slide-read-more-button{
     cursor: pointer;
     text-align: right;
     margin-top: 8px;
     color: #488A8A;
     display: none;
 }
Here is an example of how to use the code explained above:
<p class="slide-read-more">
Lorem Ipsum is simply dummy text of the printing and typesetting industry. Lorem Ipsum has been the industry's standard dummy text ever since the 1500s, when an unknown printer took a galley of type and scrambled it to make a type specimen book. It has survived not only five centuries, but also the leap into electronic typesetting, remaining essentially unchanged. It was popularised in the 1960s with the release of Letraset sheets containing Lorem Ipsum passages, and more recently with desktop publishing software like Aldus PageMaker including versions of Lorem Ipsum.
  It has survived not only five centuries, but also the leap into electronic typesetting, remaining essentially unchanged. It was popularised in the 1960s with the release of Letraset sheets containing Lorem Ipsum passages, and more recently with desktop publishing software like Aldus PageMaker including versions of Lorem Ipsum.
 Lorem Ipsum is simply dummy text of the printing and typesetting industry. Lorem Ipsum has been the industry's standard dummy text ever since the 1500s, when an unknown printer took a galley of type and scrambled it to make a type specimen book. It has survived not only five centuries, but also the leap into electronic typesetting, remaining essentially unchanged. It was popularised in the 1960s with the release of Letraset sheets containing Lorem Ipsum passages, and more recently with desktop publishing software like Aldus PageMaker including versions of Lorem Ipsum.
</p>
<div class="slide-read-more-button read-more-button">Read More</div>
<div class="slide-read-more-button">Read Less</div>
And here is the final result:
As usual, I have created a code sample in codepen, so you can play around with it, here is the link:
https://codepen.io/webmarcello8080/pen/MWOaKzV


how can we transform the last one with animation when we have somethign like post system. that one is for one div.
Hi safari. What do you mean by like a post system? If you share some code I can help you with it.
In the last exercise of yours I did it here on my side, and it worked, it worked.
But I can’t change the name (Read more), after the text extension to (Read less).
I would like that after reading the user could click on (read less) and return to the previous condition.
Could you help me?
Hi Andrew, thanks for your message, I have updated the CodePen link for you, please have a look https://codepen.io/webmarcello8080/pen/MWOaKzV , now the “read more” button becomes “read less” when is clicked.
Marcello,
It was already perfect and now it’s fantastic. Congratulations on your tutorials and I wish you every success. Thanks again for responding so quickly and being proactive.
Thanks a lot Andrew
Hello
There is a problem in this code
When there are two div, they all open together
It means to use several parts
Can you solve this problem?
Example:
Lorem Ipsum is simply dummy text.
Read More
Read Less
Lorem Ipsum is simply dummy text.
Read More
Read Less
Hi Radman,
I can’t see the issue on the code that you copied on the comment because the comment strips any HTML tags from it, can you please write your code on codepen and I will have a look at it.
Thanks
Marcello
for example i have 5 container with readmore text if i click on readmore text all of containers exapand all together
but i want to expand clicked container not all of them
https://codepen.io/meysamrad/pen/WNPyKaw