Guida in Javascript and JQuery su come aggiungere "leggi di piu'" e "leggi di meno" alla fine di un testo dopo un certo numero di caratteri.
Come aggiungere leggi di piu’/leggi di meno alla fine di un elemento HTML troppo lungo.
Questa guida vi fara’ vedere come visualizzare un certo numero di caratteri o un certo numero di righe di un elemento HTML e nascondere il resto del testo, quindi vedremo come visualizzare un elemento “leggi di piu'” clickabile alla fine del testo per visualizzare/nascondere la parte nascosta del testo. In questo tutorial proporro’ due soluzioni al problema, una statica e una piu’ dinamica.
La difficolta’ in questo tutorial e’ tenere una parte del testo sempre visibile e visualizzare un link “leggi di piu’” dopo la parte visibile, eventualmente, se il testo e’ visibile, voglio visualizzare un link “leggi meno” che nascondera’ la seconda parte del testo. Voglia applicare questa logica a qualsiasi elemento HTML solo aggiungendo una classe CSS. In oltre voglio avere al possiblita’ di decidere quanti caratteri del testo voglio visualizzare prima della scritta “leggi di piu'” e nascondere la seconda parte.
Prima di tutto, ho bisogno di una class CSS per riconoscere l’elemento HTML con cui voglio giocare, diciamo che la classes CSS sara’ ‘.add-read-more‘, inizialmente, voglio controllare se il testo e’ totalmente visibile o parte di esso e’ nascosto, per fare questo aggiungero’ un’altra classe CSS all’elemento HTML in questione chiamata ‘.show-less-content‘. Ora posso prendere il testo dell’elemento HTML con JQuery e controllare se il testo e’ abbastanza lungo, per esempio, controlloro’ se il testo e’ piu’ lungo di 300 caratteri, se il testo e’ piu’ corto di 300 caratteri allora non cambiero’ niente, se e’ piu’ lungo dividero’ il testo in due sezioni e nascondero’ la seconda sezione in CSS.
Ora, mi resta solo di aggiungere una sezione “leggi di piu’/leggi meno” alla fine della sezione del testo visibile, usero’ un elemento HTML <span></span> per delimitare il testo visibile e quello nascosto, questo elemento HTML conterra’ i due bottoni “leggi di piu'” e “leggi meno”. L’ultima cosa da fare e’ create una funzione jQuery che gestisca il click sulla sezione “leggi di piu’/leggi meno” e che apra e chiuda la seconda parte del testo.
Di segiuto potete trovare l’intero codice Javascript relativo alla logica appena spiegata:
jQuery(function ($) {
   function AddReadMore() {
      //questa variabile definisce il numbero di caratteri da visualizzare prima di "leggi di piu'"
      var carLmt = 300;
      // testo da visualizzare quando il testo viene nascosto
      var readMoreTxt = " ...leggi di piu'";
      // testo da visualizzare quando il testo viene visualizzato
      var readLessTxt = " leggi meno";


      // attraversa tutti gli elementi con la classe ".add-read-more" e cambia la grandezza del testo e visualizza "leggi di piu'"
      $(".add-read-more").each(function () {
         if ($(this).find(".first-section").length)
            return;

         var allstr = $(this).text();
         if (allstr.length > carLmt) {
            var firstSet = allstr.substring(0, carLmt);
            var secdHalf = allstr.substring(carLmt, allstr.length);
            var strtoadd = firstSet + "<span class='second-section'>" + secdHalf + "</span><span class='read-more'  title='Click to Show More'>" + readMoreTxt + "</span><span class='read-less' title='Click to Show Less'>" + readLessTxt + "</span>";
            $(this).html(strtoadd);
         }
      });

      //gestisci l'evento click Leggi di piu' e Leggi meno
      $(document).on("click", ".read-more,.read-less", function () {
         $(this).closest(".add-read-more").toggleClass("show-less-content show-more-content");
      });
   }

   AddReadMore();
});
Per rende il codice un po’ piu’ standard, usero’ variabili per gestire il numero di caratteri da nascondere e per gestire il testo da nascondere/visualizzare. Queste variabili sono nel codice sopra sono “carLmt, readMoreTxt, readLessTxt“.
Ora devo includere codive CSS per nascondere parte del testo:
.add-read-more .read-more,
.add-read-more .read-less {
   font-weight: bold;
   margin-left: 2px;
   color: blue;
.add-read-more.show-less-content .second-section,
.add-read-more.show-less-content .read-less {
   display: none;
}

.add-read-more.show-more-content .read-more {
   display: none;
}

.add-read-more .read-more,
.add-read-more .read-less {
   font-weight: bold;
   margin-left: 2px;
   color: blue;
   cursor: pointer;
}
L’ultima cosa da fare e’ aggiungere le classi CSS al test che voglio modificare, di seguito trovate il codice HTML:
<p class="add-read-moreshow-less-content">Lorem Ipsum is simply dummy text of the printing and typesetting industry. Lorem Ipsum has been the industry's standard dummy text ever since the 1500s, when an unknown printer took a galley of type and scrambled it to make a type specimen book. It has survived not only five centuries, but also the leap into electronic typesetting, remaining essentially unchanged. It was popularised in the 1960s with the release of Letraset sheets containing Lorem Ipsum passages, and more recently with desktop publishing software like Aldus PageMaker including versions of Lorem Ipsum. </p>
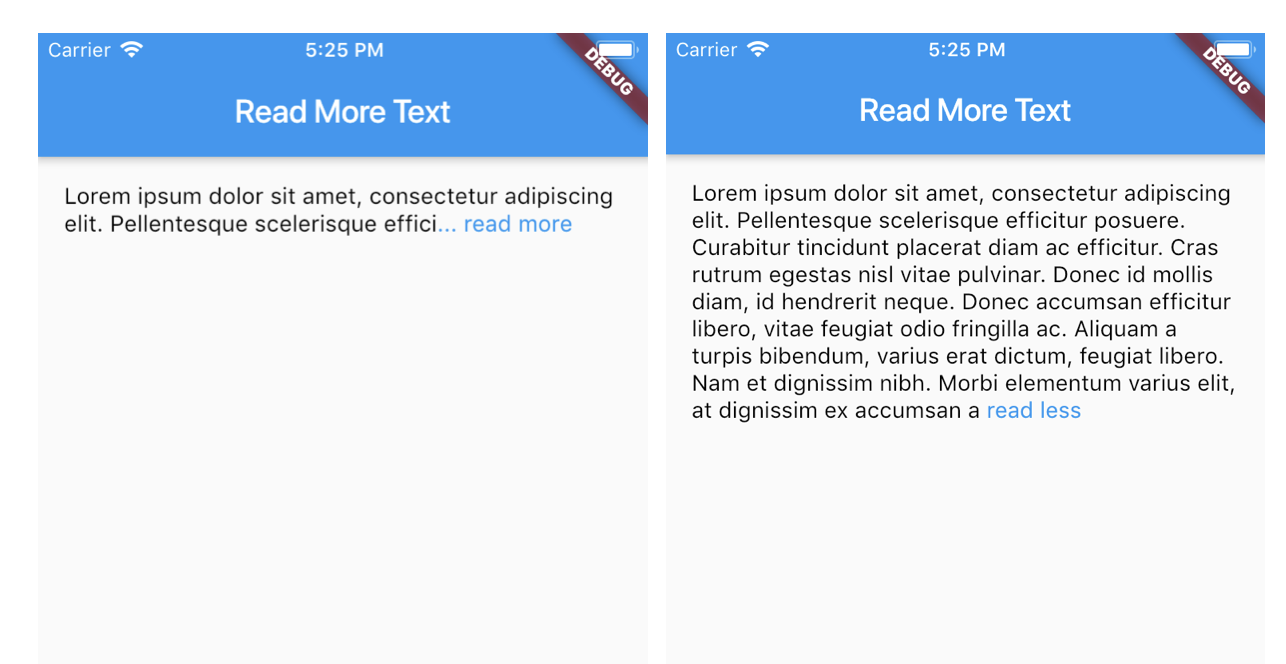
E questo e’ tutto, ecco il risultato finale:
Lorem Ipsum is simply dummy text of the printing and typesetting industry. Lorem Ipsum has been the industry’s standard dummy text ever since the 1500s, when an unknown printer took a galley of type and scrambled it to make a type specimen book. It has survived not only five centuries, but also the leap into electronic typesetting, remaining essentially unchanged. It was popularised in the 1960s with the release of Letraset sheets containing Lorem Ipsum passages, and more recently with desktop publishing software like Aldus PageMaker including versions of Lorem Ipsum. It has survived not only five centuries, but also the leap into electronic typesetting, remaining essentially unchanged. It was popularised in the 1960s with the release of Letraset sheets containing Lorem Ipsum passages, and more recently with desktop publishing software like Aldus PageMaker including versions of Lorem Ipsum
Per vedere il codice intero in azione, clicka il link sotto che porta a una demo che ho fatto in CodePen:
https://codepen.io/webmarcello8080/pen/oNGmGWL
Come aggiungere “leggi di piu'” e “leggi meno” con una animazione slide.
jQuery ha una serie di funzioni per gestire animazioni, tali slide in, slide out che possono essere applicate ad elementi HTML, quindi non abbiamo bisogno di usare CSS o Javascript per creare animazioni. Nel mio caso, usero’ un metodo “animate” per creare un effetto slide, dai un occhiata alla documentazione ufficiale a questo link per piu’ informazioni.
La prima cosa da fare in questo caso sara’ ridurre l’altezza del testo se questo e’ piu’ lungo di un certo numero di pixel, per esempio, diciamo che voglio nascondere un testo piu’ lungo di 200px. Quindi prendero’ l’elemento HTML tramite una class (usero’ la classe ‘slide-read-more‘), poi controllo se l’altezza dell’elemento e’ piu’ di 200px, se questo e’ piu’ lungo di 200px visualizzero’ un bottone “leggi di piu'” che avro’ nascosto precedentemente nel fondo dell’elemento con classe ‘slide-read-more‘.
Per leggere l’altezza corrente dell’elemento HTML con jQuery usero’ la funzione .innerHeight() che legge l’altezza di un elemento includendo padding ma non i border. In questo link potrete trovare piu’ informationi alla documentazione ufficiale.
Quindi creo una funzione jQuery che legge l’evento click sulla classe ‘.slide-read-more-button‘. Quando il bottone viene clickato, controllo l’altezza di ‘slide-read-more’, se il testo e’ 200px faccio partire l’animazione slide e visualizzo la parte inferiore del testo. Se il testo e’ piu’ lungo di 200px, setto l’altezzo del testo su 200px e faccio partire l’animazione. Questo approcio sembra piu’ semplice del precedente e il risultato e’ piu’ dinamico. Ecco il codice Javascript:
jQuery(function ($) {
   // cambia l'altezza di slide-read-more Div
   var box = $(".slide-read-more");
   var minimumHeight = 200; // altezzo del DIV in pixels
   var initialHeight = box.innerHeight();
   // riduci l'altezza del testo se e' piu' lungo di 200px
   if (initialHeight > minimumHeight) {
      box.css('height', minimumHeight);
      $(".slide-read-more-button").show();
   }

   SliderReadMore();

   function SliderReadMore() {
      $(".slide-read-more-button").on('click', function () {
         // prendi l'altezza del testo
         var currentHeight = box.innerHeight();

         // prendi l'eltezza con auto applicato al DIV
         var autoHeight = box.css('height', 'auto').innerHeight();

         // resetta l'altezza e inverti l'altezza corrente
         var newHeight = (currentHeight | 0) === (autoHeight | 0) ? minimumHeight : autoHeight;

         box.css('height', currentHeight).animate({
            height: (newHeight)
         })
         $('html, body').animate({
            scrollTop: box.offset().top
         });
      });
   }
});
In order to keep my code a bit more standard I set a couple of variables, minimumHeight contains the number of pixels that the text will be initially, box is the JQuery element (or elements) with class ‘slide-read-more’, currentHeight is the current height of box, initialHeight contain the current computed inner height of box.
Ancora, per tenere il codice un po’ standard, ho definito un paio di variabili, minimumHeight contiene il numero di pixel del testo originale, box e’ l’elemento jQuery con classe ‘slide-read-more’, currentHeight e’ l’altezza attuale di box, initialHeight contiene l’altezza cambiata di box.
Ora devo solo aggiungere poco codice CSS per nascondere la parte extra del testo che non voglio visualizzare e per lo stile del bottone “Leggi di piu'”, ecco il codice CSS:
.slide-read-more{
     overflow:hidden;
 }
 .slide-read-more-button{
     cursor: pointer;
     text-align: right;
     margin-top: 8px;
     color: #488A8A;
     display: none;
 }
Ecco un esempio del codice spiegato sopra:
<p class="slide-read-more">
Lorem Ipsum is simply dummy text of the printing and typesetting industry. Lorem Ipsum has been the industry's standard dummy text ever since the 1500s, when an unknown printer took a galley of type and scrambled it to make a type specimen book. It has survived not only five centuries, but also the leap into electronic typesetting, remaining essentially unchanged. It was popularised in the 1960s with the release of Letraset sheets containing Lorem Ipsum passages, and more recently with desktop publishing software like Aldus PageMaker including versions of Lorem Ipsum.
  It has survived not only five centuries, but also the leap into electronic typesetting, remaining essentially unchanged. It was popularised in the 1960s with the release of Letraset sheets containing Lorem Ipsum passages, and more recently with desktop publishing software like Aldus PageMaker including versions of Lorem Ipsum.
 Lorem Ipsum is simply dummy text of the printing and typesetting industry. Lorem Ipsum has been the industry's standard dummy text ever since the 1500s, when an unknown printer took a galley of type and scrambled it to make a type specimen book. It has survived not only five centuries, but also the leap into electronic typesetting, remaining essentially unchanged. It was popularised in the 1960s with the release of Letraset sheets containing Lorem Ipsum passages, and more recently with desktop publishing software like Aldus PageMaker including versions of Lorem Ipsum.
</p>
<div class="slide-read-more-button">Leggi di piu'</div>
Ed ecco il risultato finale:
Come al solito, ho creato un codice in CodePen per i piu’ scettici, cosi’ puoi giocarci, ecco il link:
https://codepen.io/webmarcello8080/pen/MWOaKzV